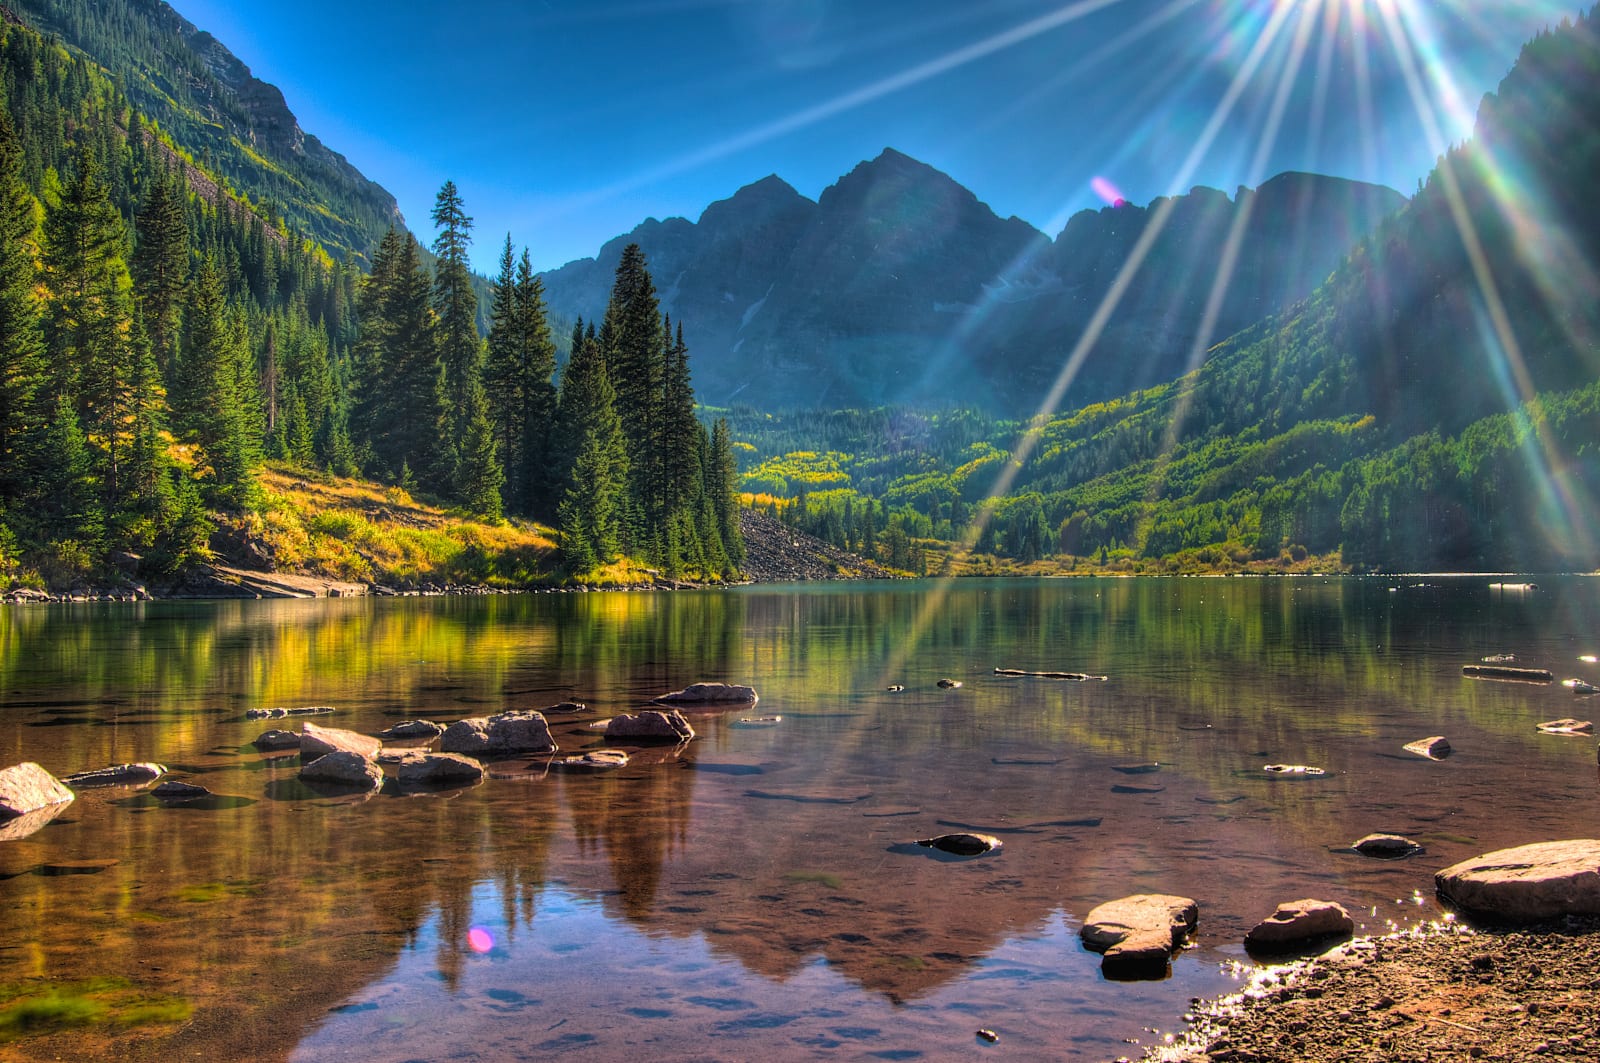
Maroon bells-Snomass Wilderness in Aspen is the perfect place for you to go on a hike. This tiny parcel of alpine terrain is just 10 miles away from Aspen. The majority of the trails are fairly easy, with some starting at 8,300 feet. Others quickly ascend. It is accessible all year round and offers many hiking opportunities.
Maroon Bells hikes are difficult due to the high elevation. Winter months are more cold than summer so the road closes around mid-November and opens again in mid May. Snowmobile tours of the mountain ranges can be arranged if you visit the area in these months. You will need to drive 6 miles one-way to reach the Maroon Lake trailhead. Hire a babysitter for your children if you are planning on hiking the trail in winter.
Maroon Bells' Scenic Loop Trail is a popular hike with stunning views of mountains, wildflowers and other natural surroundings. This loop-shaped trail starts with straightaway and ends at a bend. Continue your journey to the west end, crossing a footbridge. Continue hiking around this area of the lake, and then return back to the parking area.
Three campgrounds can be found in the area. One of them is located near the Maroon Lake trail. The second campground is located approximately 3.7 miles from Maroon Lake trailhead. It offers easier access. The trail is scenic, but it can sometimes be difficult to spot the maroonbells from afar. You may even encounter moose. Tourists love the Maroon Bells hikes, despite their beauty. While the Forest Service has attempted to manage its popularity it is important that you remember that camping at higher elevations is prohibited.
Maroon Bells Trail is one of the most popular. The trail is 1.8 miles long and offers great views of the Maroon Bells. It's also relatively flat. It's popular among backpackers and other hikers and suitable for all levels of physical ability. While it's not as difficult as the other, it is not wheelchair-accessible. It isn't necessarily the best trail in the region but it is one of its most popular.
Other than the most popular hikes in Maroon Bells there are other trails. The Scenic Loop Trail provides stunning scenery for three miles. The scenic loop route is the easiest and shortest, so it's a good idea to drive into the area before you begin your trip. Crater lakes is just one of several trails available in the region.
Acclimatization is key when hiking in Maroon Bells. It's a good idea not to leave the Welcome Station until the morning. This will give you ample time to adjust to the elevation before you embark on your hike. You'll be able to enjoy the breathtaking views once you feel comfortable at higher elevations. Maroon Bells is home to many other hiking trails.
FAQ
Where should I keep my survival gear in?
It is best to keep your emergency survival gear near you so it is easily accessible in the event of an emergency. Your best place to store your survival gear is under your bed or in your closet.
You should label all your supplies with the date and contents so you know what ones you have used.
Also, be sure to keep another copy of your inventory. You'll need to show proof that you owned the right things if something happens in your apartment or home.
How can I begin survival preparation?
Start with an Emergency Kit. A basic kit for food, water, shelter, and medical supplies. Then add items that help you stay safe and secure.
You may also want to add a solar-powered flashlight, radio, compass or whistle as well as a map, compass, whistle, whistle, and compass. Consider fishing equipment for those who live near rivers or lakes.
A bug-out bag (BOO), is another way to be prepared for any emergency. A backpack containing essential gear. Some BOOs include a tent, sleeping bags and firestarter. They also contain pots, stoves, cookware, batteries, flashlights, first-aid kits, toiletries, and other essential gear.
There are many options available when it comes to disaster preparedness. These basics are the starting point. Then, expand your list to suit your needs.
What are the essential things I should know before I start my doomsday preparation?
First, you'll want to gather information about your area. What are the most common natural disasters that could occur in your region? Are there any major dangers?
You should consider purchasing flood insurance if your home is in a flood zone. Flooding is one the most serious threats to your life in a crisis.
Consider purchasing tsunami insurance if your home is near the coasts. Tsunamis are caused by underwater earthquakes. They can strike without warning so it is best to be prepared.
Next, figure out how long it will take you to become self-sufficient. How long will you be able to fend for yourself?
Is it possible to only be gone for a couple of days? Or will you be away from home for weeks or months?
Are you planning on living alone? You will likely need a weapon if you live alone. It doesn't matter whether you choose a gun, a bow and an arrow. Make sure that you feel comfortable using the tool.
Apart from weapons, you will also need tools such a saw, shovel, hammer and nails. These tools are useful for making shelters, or creating makeshift weapons.
You'll probably want to stockpile water and food. You will need enough food to last several days.
This list is not exhaustive. You don't need to purchase all of the items. At the very least, you need to get started.
What should every doomsday prepared have?
Not only what you need, but also the amount of it. Simple answer: If you are to survive for long periods of time, you need to be able to live off the land.
You'll be surprised at how many options there are to prepare for an emergency. This list does not necessarily mean that you should go out and purchase everything. It is important to know where you can start when preparing for disaster.
It is important to be prepared for everything. If you are serious about surviving, you must be ready for anything.
How many days worth of supplies should I have stored away?
In an ideal world, you would want to keep three months worth supplies on hand. That would include enough food, water, as well as other necessities, to sustain you for three consecutive months.
This number can vary depending on how severe the emergency is. In remote areas, there may not be any neighbors nearby who could help you. Maybe there is no power grid.
In such cases, it is a good idea to prepare for a more long-term situation.
What are my emergency supplies?
You should plan ahead if you intend to travel for a prolonged period of time. Consider packing food, water and a first aid kit. This will help you feel more prepared and confident that you will survive whatever situation arises.
Start with a basic first-aid kit. Make sure you have antiseptic cream, painkillers and gauze pads. Also, include scissors, tweezers as well as thermometers, alcohol swabs, disinfectant wipes, disinfectant wipes, and thermometers. You may also want to include a flashlight for checking what is in your kit during power outages.
A good way to store these items is in a plastic container with a lid. This will keep your items clean and dry.
You should also consider storing food for up to two weeks. You could even freeze your own food. These recipes are simple to prepare and don't require any cooking pans or pots. Simply add hot water and you are ready to go!
A solar-powered battery backup system is another great idea. This will allow for you to charge your phone, tablet and laptop.
Statistics
- Approximately a hundred and seventeen million people earn, on average, the same income they did in 1980, while the typical income for the top one percent has nearly tripled. (newyorker.com)
- A gravel bike was the clear winner, receiving more than 90 percent of the votes. Background: This summer, we surveyed our readers about what they’d shove into a backpack if they were caught unprepared for the collapse of society. (inverse.com)
- Receiving 11.2 percent of votes in our reader survey was a propane torch. Background: This summer, we surveyed our readers about what they’d shove into a backpack if they were caught unprepared for the collapse of society. (inverse.com)
External Links
How To
How to treat a cut in a survival situation
How should you respond if you are hurt? How to deal with your wound is the first thing you should think about. You need to learn how to stop bleeding and clean the wounds. Next, you need to stop the infection from getting worse. If the infection is severe, consult your doctor immediately.
Be prepared before you are hurt. You should ensure you have enough water and food. It is good to have a medical kit. Also, make sure you have a knife and rope. These items should always be with you. These items could be of assistance to you if you find yourself in trouble.
If you don’t have these things, you may want to get them. You should not forget basic knowledge. You should be able to apply bandages and disinfectants. Also, learn how to properly use a knife. It is important to apply pressure when cutting. Blood won't escape if you do this.
In a survival situation you need to look around for any useful items. Perhaps you can dig a hole with a stick. A rock can be used to crack open a shell. You should immediately take care of the wound. Do not allow it to become infected.
Use warm water and soap to clean the wound. Apply an antiseptic cream. The wound should be covered with a bandage. Bandaging keeps the wound clean and prevents infection.
You should inspect the wound daily after applying the bandage. The bandage should be removed only if it becomes dirty. Infections can result if the bandage is not removed promptly.
Tell someone else if pain is felt while cleaning the wound. He/she may be able to assist you. It is also a good idea to ask the person to clean your wound.
If you are not alone, you should remain still for at the least 10 minutes following cleaning the wound. This will allow the dirt to settle.
Avoid scratching the wound. It is easier for germs and bacteria to get in the body by scratching it. Also, avoid touching the wound. Germs may spread through your hands.
A bandage is a way to protect the wound. It is important to change the bandage frequently. This will keep your wounds from getting infected.
If you don’t have any bandages, you can still use leaves. Leaves are easy to find. You can even use a piece cloth as a wrap.
Also, pay attention to the weather. It is important to dress wounds more carefully when the temperature falls below 40 degrees Fahrenheit. Cold air can slow down the healing process.
Long sleeves and pants are essential if you live somewhere with cold temperatures. You should also wear gloves. Also, gloves should be on your hands.
Also, you should never walk barefoot. Blisters can result from walking without shoes. These blisters may quickly turn to wounds.
First aid supplies are important for camping and hiking. A small bag should be packed with bandages, and other essentials.
It is important to consider the type and extent of your injury. If you need stitches, you should go to a hospital.
Do not touch any burns you have just received. That way, you can prevent infection.
Stop hunting, fishing or trapping immediately if you get hurt. You should then call 911.